

With Mother's Day coming up in less than a week, you
might want to purchase some of your mother's favorite items
and put them together to make a pretty gift basket for her
or other special women in your life.
or other special women in your life.

Here are some tips for making your gift basket for Mom
especially attractive and secure.

My co-workers donated money for the supplies for the baskets that are in this blog post.
The baskets will be with other departments' gift baskets in the raffle. To try to make my unit's
baskets as "raffle-worthy" as possible, I did some internet surfing to find out how to make the
baskets attractive. I came across some you tube videos made by Cari Thomas of Santa Barbara
Gift Baskets. I'm using some Cari's tips and even came up with some of my own.
Sometimes it is nice to have a "theme" for a gift
basket so the items seem to go together. Also, a
"theme" gives you a starting point in deciding
what to purchase. Even a few items, when packaged
together in the basket, seem more special (and even
bigger) than they actually are on their own.

This is a "Summer" basket. It has three packages of shells in the back, some ocean-scented candles
and soaps and a blue fish-shaped bottle for fun. The picnic basket came from a consignment sale.
After you have decided what you want to put in the gift,
you need to get a container that will hold the items.
A gift basket doesn't have to be an actual "basket"...
you can be creative and pick whatever you want.
Here are my baskets (I was not creative, I only used baskets)
and the gift items that are going in them before being assembled...
 I purchased items from Burlington, Big Lots, Wal Mart, Dollar Tree, Michaels, Costco and a consignment sale.
One of the main things I wanted to accomplish was to have
the gift items sitting up and elevated as much as possible...
not sunk down into the basket and hard to see. Of course,
you have to balance that goal with the weight of the items.
Cari uses brown craft paper to fill the bottom of her baskets
and to provide support in back of heavier items. She covers
the paper with natural-colored excelsior. She says that you
can also use newspaper in place of craft paper.
I wanted to try another product to act as a filler for the
bottom of the baskets and also provide support to help
the items sit upright...insulation spray foam.
 There are other brands of spray insulation foam that would work in the same way for this project as
Great Stuff. This can came from the paint department of WalMart. It is also available at hardware stores, Home Depot, Lowes, etc. Follow all of the safety precautions on the can. Keep children and pets away from the foam for several hours after it is sprayed out until it hardens.
If you are only going to make one small basket, it is not
worth getting the spray foam because it costs $3 per can.
If you are needing to fill a large basket, you might want
to give it a try. It also served to hold wooden skewers in
place which in turn held gift items upright.
I learned when I was trying Great Stuff to fill baskets
and bags to make candy bouquets, that you can't layer it
too thick or it will not dry and cure properly. This time I
made outlines of the baskets onto newspaper to know
how large of a surface to lay down in one layer.

For the deeper baskets I made two or three patterns because
they will need more layers of foam to elevate the items.
This is how much one can of foam sprays out...
 Once you start spraying the foam, you have to keep going or the nozzle will clog up.
To buy that much foam in a craft store would cost a lot more.
Paper works fine as a basket filler but I wanted something
that would not squish down over time and would be firm.
I used four cans of foam for nine baskets. The foam expands
as it dries and cures. It sticks to whatever it touches before
it is dry. The bottoms of my foam pieces will have news
print on them forever. I thought about spraying the foam
on colored tissue paper so it would look nicer when the
basket is disassembled by the recipient but then didn't do it.
 I had some foam left in my last can so I just sprayed out some shapes on more newspaper.
That extra foam came in handy to help in securing and leveling items in the baskets.
The foam takes several hours to be dry enough to work with.
I usually like to try to give it overnight to dry completely.
Almost all of my foam pieces had to be cut a least a little to
fit inside the baskets neatly. It is easy to cut with a serrated
knife like a bread or steak knife.
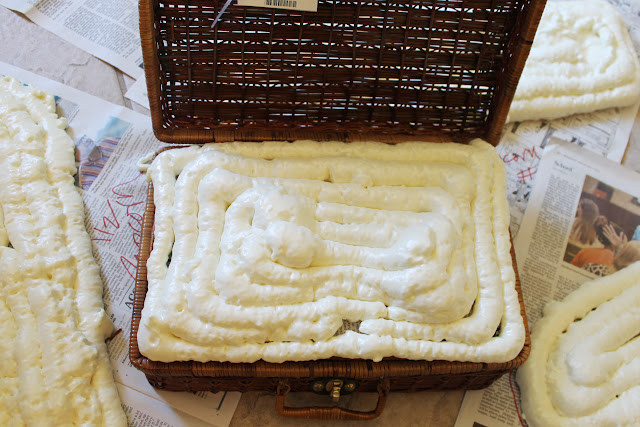
After I cut one of the outside rings of foam off,
the foam fit well inside this suitcase-like basket.
 This basket from the consignment sale had some paper filler in it when I bought it.
I think it was a gift basket before.
Burlington had a great selection of inexpensive but nice
looking soaps, lotions, etc. I bought several items there.
This kitchen caddy with hand soap, dish soap and lotion
came from there. I paired it with a pack of moisturizers
to fill out the basket.

This basket only needed one layer of foam. The caddy was
kind of heavy so I used some thin gold wire to anchor it to
the edge of the bottom of the basket to keep it from tipping.
Excelsior was added to cover the foam.

Cari said that she uses excelsior on most of her baskets
but that you can also use tissue paper to cover up
whatever you are using for your filler. I got a large bag
of natural colored excelsior at a floral supply place for
$12 (since I had several baskets to make). I also found
some smaller bags at Hobby Lobby for $3 each and
even smaller bags at Dollar Tree.
 The excelsior goes a long way if you pull it apart and fluff it. I did not use even half of all of that pictured. The Container Store also carries excelsior. You could also use colored paper filler
or colored Easter grasses.
A splurge I made at the floral supply place is several
sizes of clear cellophane wrap. So many times during the
year I am wishing I had some but don't want to run to
the craft store to buy it...then the urge passes...I forget.
These rolls are 100 feet long. You can get smaller amounts
in the gift wrap section of most stores.
 I saw later that Michaels has the 40" x 100' clear cellophane for $10...
that is less than I paid plus I could have used a coupon...live and learn.
You don't have to have the cellophane (but it does give
the gift basket a professional look).
Here's the kitchen caddy basket finished...

OK...back to filling baskets...the gourmet popcorn basket
was fairly long and deep. It took several layers of foam.

I put two smaller bags of popcorn on more layers of foam
to make it about the same height of the larger white popcorn.
After I got enough foam to look good in the back of the
basket, I stuck wooden skewers into the foam stacks
to not only hold the foam in place but to serve as supports
for the bags of popcorn to keep them upright.

The popcorn bags were then taped with clear tape on the skewers.

The front of the basket also got two layers of custom made
foam pieces for more popcorn. They were placed towards the
front of the basket so folks could read the writing on the
popcorns on the back row. They were also secured with skewers.


item was a kabob wire basket so it went in first.

It sat on one layer of foam and then had foam pieces
wedged in the front of it and behind it. I also ran a thin
wire from one side of the basket, over the top of the kabob
basket's cardboard casing, and down to the other side of
the basket and secured the wire onto the basket.
The heaviest item in the grill master basket was a set of
grilling tools. They were also long. I decided instead of
trying to stand them up, I would lay them across the
front of the basket and let the rim of the basket support
most of the weight of the tools. I also added a stack of
smaller pieces of foam to support the center of the tools.

A wooden skewer was stuck into the foam stack to hold it
in place. I left enough sticking out that I could wire the
center of the tools to the skewer also. The non-business end
of the tools were wired onto the basket rim also.
The stack of foam was covered with a bar-b-que themed towel.
I didn't fill the whole basket with foam and excelsior because
I wanted another nice item, the temperature probe fork to the
left of the kabob basket, to be entirely visible.

Cari had said to have everything facing forward in the basket
but on this basket I had to have a couple of larger things
behind the kabob basket to fit everything in. I faced them
backwards so even the back of the basket looks filled too.
Here is the front...

...and the back...

A basket with a handle in the middle does give you an
opportunity to use it to secure items onto it for stability.
The boxed set of Laura Ashley bath products just so
happened to fit between the top rim of the basket and the
underneath of the handle. This basket's foam pieces were
stacked to also help support the bath set. Five skewers
were placed along the backside of the boxed set to help
hold it upright.

Two skewers were pushed down as far as possible into
the foam layers. Then they were cut off with just a
little showing that will help hold the set up from the front.

Two bags of lavender bath salts were held upright and in place
with skewers and tape towards the front of the basket.
The long-handled bath brush was place vertically and wired
onto the handle. Having a tall item in the middle of the
basket gives you a good place to gather and attach your
cellophane and attach a bow.
The five skewers across the back of the set were not
too attractive so I covered them up with a set of lemon
soaps and it's lid. I did have to have two skewers showing.
 back of basket
 front of basket
The Burt's Bees products were secured in two
layers of foam. If you use the spray foam and you
get a lump that makes the products sit uneven,
just use a serrated knife to level the foam.

Skewers and tape hold the products up in the foam.


In the Summer-themed basket only one layer of foam
was used because it was shallow. Smaller cut pieces of
foam were added around the items in the middle row
of the basket to help them be more secure and not
wiggle around.

The foam was covered with excelsior.


The baskets made for babies had a stuffed animal with a
soft blanket wrapped around it for the main item. Those
came from Costco. Most of the smaller items in the
baby baskets came from Dollar Tree.
To make the wrapped stuffed animal stand up and not
topple over, three skewers were bunched together, stuck
part way up into the blanket roll and then part way
down into the layers of foam in the basket.

A baby picture frame was made to stand up by placing
three wooden skewers behind it and down into the foam.

To cover the skewers, a package of napkins
was taped onto the box.

I didn't care for all that writing on the packaging for the bibs
so I folded it down, taped a skewer under the fold and
pushed the skewer in the foam.

I used some pink Easter grass to cover the foam. I didn't
want items to cover up the writing on the main item
so people could tell what it is so I laid some items flat.


The baby boy basket was made pretty much the same way.
Blue excelsior from Hobby Lobby was used in that one.
 This is the back view.
In the boy basket a bib was used to cover the skewers holding up the frame.
This is the front view

One basket that did not use any foam was the kitchen one.
I had a crock pot that my grocery store gave out for a
certain number of customer loyalty points. I didn't need it
so I donated it to the basket. Since it was heavy it was
placed directly in the bottom of the basket.

It did not leave much room in the basket for much else so
I wired a basket on top of the crock pot to hold lots of small
items. To keep it from slipping to either side, I wired all four
sides of the black basket. The wire goes up under the crock pot.
 Some of the larger items in the basket were wired down also.
To utilize the small space left by the crock pot, I used plastic
cups to hold the long-handled utensils. Kitchen towels were
wrapped around the handles before placing them in the cups.

I must have forgotten to take a photo of the
finished kitchen basket but here it is with the
whole group of baskets before being wrapped.

So if you want to wrap your basket, roll out the clear
cellophane on the table about two and a half times the
height of your basket. You want to leave a generous
amount at the top for the crown of cellophane.
Place your basket in the center of the cellophane. Pull
the cellophane up from each end and see if it is about
the same in the front and the back. Start gathering the
cellophane from each side in your hands a little above
the highest point on your basket.
 The wider/bigger your basket, the wider your cellophane will need to be.
You can secure your gathers at the top with a piece of
tape, twine, ribbon, etc. Try to make the cellophane tight
so folks can see through it better.
The sides will be open at this point.
Tuck the back side of cellophane under the front.
Cari says don't tape it on the sides (is that tacky?)
but I think it is easier for a novice like me to put one
piece of tape to hold the side closed while I am
working on getting the final point of cellophane neatly taped.

Then pull the resulting point as neatly as possible
(fold it a little like you are wrapping a present)
either under the basket or to the back and then tape
it with clear tape again. Sometimes the shape of the
basket dictates how hiding the taping the fold goes.
Add a bow to the top of the cellophane where your
gathers are. There you have your gift basket guaranteed
to thrill the person that you give it to!
Here are my baskets (I was not creative, I only used baskets)
and the gift items that are going in them before being assembled...

One of the main things I wanted to accomplish was to have
the gift items sitting up and elevated as much as possible...
not sunk down into the basket and hard to see. Of course,
you have to balance that goal with the weight of the items.
Cari uses brown craft paper to fill the bottom of her baskets
and to provide support in back of heavier items. She covers
the paper with natural-colored excelsior. She says that you
can also use newspaper in place of craft paper.
I wanted to try another product to act as a filler for the
bottom of the baskets and also provide support to help
the items sit upright...insulation spray foam.

Great Stuff. This can came from the paint department of WalMart. It is also available at hardware stores, Home Depot, Lowes, etc. Follow all of the safety precautions on the can. Keep children and pets away from the foam for several hours after it is sprayed out until it hardens.
If you are only going to make one small basket, it is not
worth getting the spray foam because it costs $3 per can.
If you are needing to fill a large basket, you might want
to give it a try. It also served to hold wooden skewers in
place which in turn held gift items upright.
I learned when I was trying Great Stuff to fill baskets
and bags to make candy bouquets, that you can't layer it
too thick or it will not dry and cure properly. This time I
made outlines of the baskets onto newspaper to know
how large of a surface to lay down in one layer.

For the deeper baskets I made two or three patterns because
they will need more layers of foam to elevate the items.
This is how much one can of foam sprays out...

To buy that much foam in a craft store would cost a lot more.
Paper works fine as a basket filler but I wanted something
that would not squish down over time and would be firm.
I used four cans of foam for nine baskets. The foam expands
as it dries and cures. It sticks to whatever it touches before
it is dry. The bottoms of my foam pieces will have news
print on them forever. I thought about spraying the foam
on colored tissue paper so it would look nicer when the
basket is disassembled by the recipient but then didn't do it.

That extra foam came in handy to help in securing and leveling items in the baskets.
The foam takes several hours to be dry enough to work with.
I usually like to try to give it overnight to dry completely.
Almost all of my foam pieces had to be cut a least a little to
fit inside the baskets neatly. It is easy to cut with a serrated
knife like a bread or steak knife.

After I cut one of the outside rings of foam off,
the foam fit well inside this suitcase-like basket.

I think it was a gift basket before.
Burlington had a great selection of inexpensive but nice
looking soaps, lotions, etc. I bought several items there.
This kitchen caddy with hand soap, dish soap and lotion
came from there. I paired it with a pack of moisturizers
to fill out the basket.

This basket only needed one layer of foam. The caddy was
kind of heavy so I used some thin gold wire to anchor it to
the edge of the bottom of the basket to keep it from tipping.
Excelsior was added to cover the foam.

Cari said that she uses excelsior on most of her baskets
but that you can also use tissue paper to cover up
whatever you are using for your filler. I got a large bag
of natural colored excelsior at a floral supply place for
$12 (since I had several baskets to make). I also found
some smaller bags at Hobby Lobby for $3 each and
even smaller bags at Dollar Tree.

or colored Easter grasses.
A splurge I made at the floral supply place is several
sizes of clear cellophane wrap. So many times during the
year I am wishing I had some but don't want to run to
the craft store to buy it...then the urge passes...I forget.
These rolls are 100 feet long. You can get smaller amounts
in the gift wrap section of most stores.

that is less than I paid plus I could have used a coupon...live and learn.
You don't have to have the cellophane (but it does give
the gift basket a professional look).
Here's the kitchen caddy basket finished...
OK...back to filling baskets...the gourmet popcorn basket
was fairly long and deep. It took several layers of foam.

I put two smaller bags of popcorn on more layers of foam
to make it about the same height of the larger white popcorn.
After I got enough foam to look good in the back of the
basket, I stuck wooden skewers into the foam stacks
to not only hold the foam in place but to serve as supports
for the bags of popcorn to keep them upright.

The popcorn bags were then taped with clear tape on the skewers.

The front of the basket also got two layers of custom made
foam pieces for more popcorn. They were placed towards the
front of the basket so folks could read the writing on the
popcorns on the back row. They were also secured with skewers.

Here is the popcorn basket with excelsior, cellophane and
a bow made of twine added.

The "Grill Master" basket took a lot of "monkeying" with to
get everything I had gathered into the basket. The largest item was a kabob wire basket so it went in first.

It sat on one layer of foam and then had foam pieces
wedged in the front of it and behind it. I also ran a thin
wire from one side of the basket, over the top of the kabob
basket's cardboard casing, and down to the other side of
the basket and secured the wire onto the basket.
The heaviest item in the grill master basket was a set of
grilling tools. They were also long. I decided instead of
trying to stand them up, I would lay them across the
front of the basket and let the rim of the basket support
most of the weight of the tools. I also added a stack of
smaller pieces of foam to support the center of the tools.

A wooden skewer was stuck into the foam stack to hold it
in place. I left enough sticking out that I could wire the
center of the tools to the skewer also. The non-business end
of the tools were wired onto the basket rim also.
The stack of foam was covered with a bar-b-que themed towel.
I didn't fill the whole basket with foam and excelsior because
I wanted another nice item, the temperature probe fork to the
left of the kabob basket, to be entirely visible.

Cari had said to have everything facing forward in the basket
but on this basket I had to have a couple of larger things
behind the kabob basket to fit everything in. I faced them
backwards so even the back of the basket looks filled too.
Here is the front...

...and the back...

A basket with a handle in the middle does give you an
opportunity to use it to secure items onto it for stability.
The boxed set of Laura Ashley bath products just so
happened to fit between the top rim of the basket and the
underneath of the handle. This basket's foam pieces were
stacked to also help support the bath set. Five skewers
were placed along the backside of the boxed set to help
hold it upright.

Two skewers were pushed down as far as possible into
the foam layers. Then they were cut off with just a
little showing that will help hold the set up from the front.

Two bags of lavender bath salts were held upright and in place
with skewers and tape towards the front of the basket.
The long-handled bath brush was place vertically and wired
onto the handle. Having a tall item in the middle of the
basket gives you a good place to gather and attach your
cellophane and attach a bow.
The five skewers across the back of the set were not
too attractive so I covered them up with a set of lemon
soaps and it's lid. I did have to have two skewers showing.


The Burt's Bees products were secured in two
layers of foam. If you use the spray foam and you
get a lump that makes the products sit uneven,
just use a serrated knife to level the foam.

Skewers and tape hold the products up in the foam.


In the Summer-themed basket only one layer of foam
was used because it was shallow. Smaller cut pieces of
foam were added around the items in the middle row
of the basket to help them be more secure and not
wiggle around.

The foam was covered with excelsior.

The baskets made for babies had a stuffed animal with a
soft blanket wrapped around it for the main item. Those
came from Costco. Most of the smaller items in the
baby baskets came from Dollar Tree.
To make the wrapped stuffed animal stand up and not
topple over, three skewers were bunched together, stuck
part way up into the blanket roll and then part way
down into the layers of foam in the basket.

A baby picture frame was made to stand up by placing
three wooden skewers behind it and down into the foam.

To cover the skewers, a package of napkins
was taped onto the box.

I didn't care for all that writing on the packaging for the bibs
so I folded it down, taped a skewer under the fold and
pushed the skewer in the foam.

I used some pink Easter grass to cover the foam. I didn't
want items to cover up the writing on the main item
so people could tell what it is so I laid some items flat.


The baby boy basket was made pretty much the same way.
Blue excelsior from Hobby Lobby was used in that one.

In the boy basket a bib was used to cover the skewers holding up the frame.
This is the front view

One basket that did not use any foam was the kitchen one.
I had a crock pot that my grocery store gave out for a
certain number of customer loyalty points. I didn't need it
so I donated it to the basket. Since it was heavy it was
placed directly in the bottom of the basket.

It did not leave much room in the basket for much else so
I wired a basket on top of the crock pot to hold lots of small
items. To keep it from slipping to either side, I wired all four
sides of the black basket. The wire goes up under the crock pot.

To utilize the small space left by the crock pot, I used plastic
cups to hold the long-handled utensils. Kitchen towels were
wrapped around the handles before placing them in the cups.

I must have forgotten to take a photo of the
finished kitchen basket but here it is with the
whole group of baskets before being wrapped.

So if you want to wrap your basket, roll out the clear
cellophane on the table about two and a half times the
height of your basket. You want to leave a generous
amount at the top for the crown of cellophane.
Place your basket in the center of the cellophane. Pull
the cellophane up from each end and see if it is about
the same in the front and the back. Start gathering the
cellophane from each side in your hands a little above
the highest point on your basket.

You can secure your gathers at the top with a piece of
tape, twine, ribbon, etc. Try to make the cellophane tight
so folks can see through it better.
The sides will be open at this point.
Tuck the back side of cellophane under the front.
Cari says don't tape it on the sides (is that tacky?)
but I think it is easier for a novice like me to put one
piece of tape to hold the side closed while I am
working on getting the final point of cellophane neatly taped.

Then pull the resulting point as neatly as possible
(fold it a little like you are wrapping a present)
either under the basket or to the back and then tape
it with clear tape again. Sometimes the shape of the
basket dictates how hiding the taping the fold goes.
Add a bow to the top of the cellophane where your
gathers are. There you have your gift basket guaranteed
to thrill the person that you give it to!